
Welcome to our Guide on how to see Aurora Borealis where we review all the facts about the Northern Lights and explain how to interpret the Northern Lights forecast, to maximize your chances of seeing this incredible natural wonder.
Aurora Borealis, or the Northern Lights, is an amazing phenomenon and a thrilling experience to behold. We were fortunate enough to see the Northern Lights multiple times in various locations, including Norway, Finland, and Iceland. Don’t miss our detailed guide on How to see the Northern Lights in Tromso, Norway. However, before visiting these places, we thoroughly researched the Northern Lights, which helped us choose the best locations and times to view them. We made this guide to assist others in maximizing their chances to see the Northern Lights.
In this guide, you will find everything you need to know about how the Northern Lights are formed. We will simplify and explain how to read the Northern Lights forecast and recommend the best Northern Lights app. Additionally, we will share our insights on how to photograph the Northern Lights and recommend the best camera and smartphone settings. Also, we will explain expectation vs reality when watching the Northern Lights with your eyes rather than through the camera. A lot of data ahead, so brace yourselves!
Note that all photography on this guide (and throughout our website) was shot by me (Alina) and if you wish to purchase any, some are available at my Etsy shop.
For more Itineraries and travel guides, visit our Destinations page.
Note: Some of the links below contain affiliate links. If you click through and make a purchase, we earn a small commission at no extra cost to you. This will help us provide more free content for you. Thank you!
How to See Aurora Borealis - Northern Lights Facts
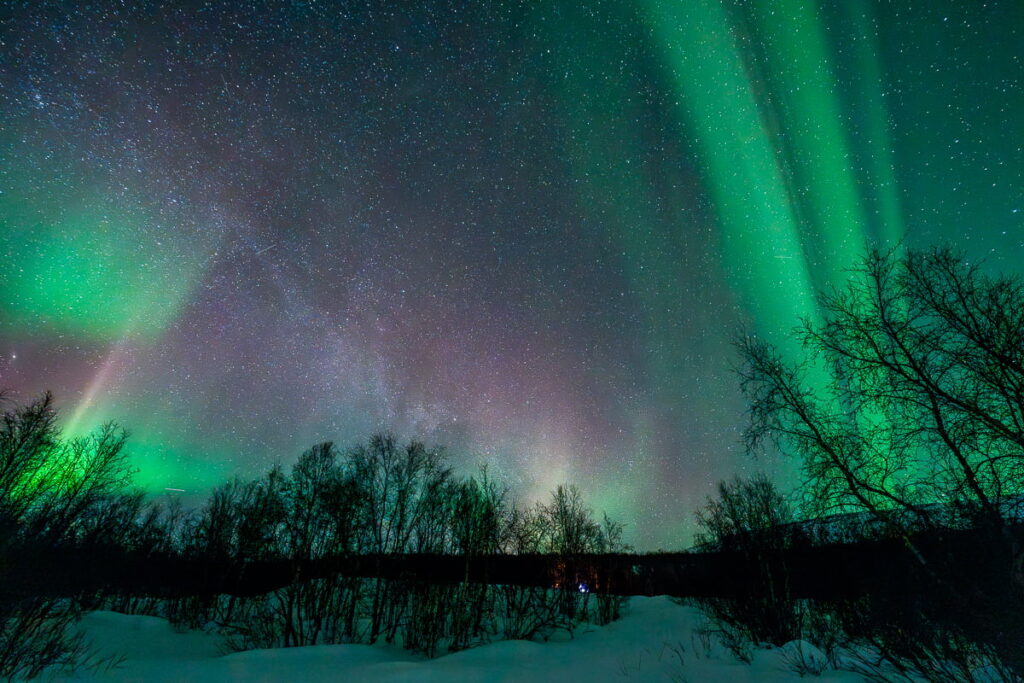
The Northern Lights, also known as the Aurora Borealis, are spectacular natural light displays that occur when charged particles from the sun, called solar wind, collide with gases in Earth’s atmosphere. This interaction causes energy to be released, which we see as colored light. These events typically take place in polar regions since the charged particles are drawn toward Earth’s magnetic poles. The term “Aurora” comes from the Roman goddess of dawn, while “Borealis” refers to the northern direction. There is Aurora in the South Pole as well, there it is called Aurora Australis which is primarily visible over Antarctica and in the southern parts of Australia and New Zealand.

Auroras are most commonly observed within a band known as the auroral oval, which is usually centered around 60° to 70° north and south of the Equator, near the Arctic and Antarctic Circles. During solar storms, the auroral oval can expand, increasing the chances of seeing the northern lights at lower latitudes.
Now, let’s discuss the different colors you might see in the Northern Lights. When the solar particles collide with oxygen molecules at altitudes of 100 to 300 km above Earth, the resulting light appears green, which is the most common color. At altitudes above 300 km, collisions with oxygen molecules produce red light. Blue and purple colors are seen from collisions with Nitrogen atoms and ions at lower altitudes, below 100 km above Earth. During solar storms, the chances of seeing colors other than green are significantly higher.


Auroras are more frequent during periods of high solar activity, which follows an 11-year cycle. The next expected peak in solar activity will be around 2025 to 2026 when the likelihood of major solar storms will increase. So get ready!
How to Interpret the Northern Lights Forecast
Several factors are included in the Northern Lights forecast, we will elaborate on each one and try to simplify and explain what to look for.
KP Index
The geomagnetic activity of the Northern Lights is measured by the KP Index, a scale from 0 to 9. It is a very important indicator of aurora strength, the higher the value, the Northern Lights will be visible at lower latitudes. Rarely, in major geomagnetic storms, the KP can get as high as 8 or even 9, allowing the aurora to be visible all over Europe!
However, people mistakenly consider only this factor when interpreting the Northern Lights forecast. In fact, at high latitudes within the Auroral oval, such as Tromso, Norway, the KP Index is not important. This means that the Northern Lights are visible there even with a low KP index! At those high latitudes, the next factor is the key factor.
Bz IMF
The Bz Marks the direction of the Interplanetary Magnetic Field (IMF), and it is the most important parameter as it indicates whether the aurora will be seen, measured in nanoteslas (nT). A negative number means that the orientation of the Interplanetary Magnetic Field is oriented against the magnetic field of the Earth, pulling the solar wind towards Earth’s Poles. You will need a negative number for it to appear, and a more negative number, such as below -5 nT will result in stronger Auroras.
Without a negative number, the chances to see the Northern Lights are slim, even within the Auroral oval. However, don’t be disappointed if the numbers are positive, as the value can change dramatically and unexpectedly. Make sure to check the forecast for the next hour ahead. Unfortunately, there are no long-term forecasts for this one.

The next 3 factors are good indicators of the intensity of the Northern Lights:
Bt IMF
The Bt IMF indicates the strength of the Interplanetary Magnetic Field, the higher the better. It is measured in nanoteslas (nT), the higher the better, and above 10 nT is considered strong.
Solar Speed
Solar Speed indicates the velocity at which charged particles travel toward Earth, typically measured in kilometers per second (km/s). The faster the value, the better, the Northern Lights will move more rapidly and have brighter colors. Above 400 km/s is considered a high Solar speed.
Solar Wind Density
Solar Wind Density indicates how many particles are about to hit Earth’s atmosphere. It is measured in particles per cubic centimeter (p/cm³), the more the merrier, above 10 p/cm³ is considered high-density Solar Wind.
To summarize, good conditions for spectacular Northern Lights displays occur when high-speed, dense solar wind carries a strong magnetic field with a negative Bz. To access this data, you can visit websites like NASA’s Space Weather Prediction Center (SWPC) and NOAA, which provide real-time solar wind information. However, this information can often feel overwhelming. To simplify things, we recommend using a Northern Lights app that presents the Northern Lights forecast in a more user-friendly manner. Keep reading to see which Northern Lights app we love.

Best Northern Lights App
After trying several options, we’ve narrowed it down to three apps: the first is our favorite and the best Northern Lights app in our opinion, and the other two apps are also good choices.
Hello Aurora
We found Hello Aurora to be the best Northern Lights App. It provides comprehensive information about the Aurora Borealis Forecast, including the KP Index, Bz, Bt, Solar Speed, and Solar Density. Each of these values is color-coded based on its intensity. By tapping on each value, you can access data for the next hour. Additionally, there is a reliable long-term KP Index forecast available for the upcoming three weeks.


The map feature displays cloud cover and its forecast for the next few hours. If that’s not enough, you can explore Northern Lights photos shared by other users in the Moments tab, and you can contribute your own photos as well.
Aurora
We primarily use the Aurora App for its Live Aurora Webcams. This unique feature allows you to view the auroras directly from your smartphone. There are several webcams positioned around the world that update based on the time of day (showing areas where it is currently dark). While the app also offers forecasts, they are not as user-friendly as those in Hello Aurora.
AuroraAlerts
The AuroraAlerts App provides all the necessary forecasts, but Hello Aurora presents the data in a more visually appealing manner. We particularly enjoyed the real-time Aurora oval displayed in the Graphs tab, which provides additional information from various forecasts.
Next in our Aurora Borealis guide, we will cover all you need to know to maximize your chances of seeing the Northern Lights.

How to Maximize Your Chances to See the Northern Lights
The next 4 factors are essential to maximizing your chances of seeing the Northern Lights. To See the Aurora Borealis you will need all 4:
1. Location - Best Places to See Aurora Borealis
The best places to see Aurora Borealis are within the Auroral oval. Usually, the Auroral oval lies between 65° and 75° latitude, and depending on the Solar factors, the Northern Lights can be frequently seen there. The best places to see the Northern Lights are the northern parts of Norway, Sweden, Finland, Iceland, Canada, and Alaska. As stated above, a solar storm can increase the KP Index which will extend the auroral oval to lower latitudes, allowing the Aurora Borealis to be visible there. However, these occasions are quite rare so do not rely on that.
When choosing the best place to see the Aurora Borealis, you need to consider artificial light pollution, as it brightens the sky and lowers the visibility of the Northern Lights. Therefore, the further you venture from urban areas, the clearer your view of the aurora will be.

2. Timing - Best Time to See Aurora Borealis
Timing is crucial to see the Northern Lights as it is essential to have dark conditions, and the darker it is, the better, so Nighttime is the time of the day. However, did you know that places in the Arctic Circle, such as Tromso, Norway, during the summer months have a natural phenomenon called ‘the midnight sun’? Being this far north influences the daylight time greatly, and during May and July, the sun never sets! So you have to choose the right time of the year to see the Northern Lights there.
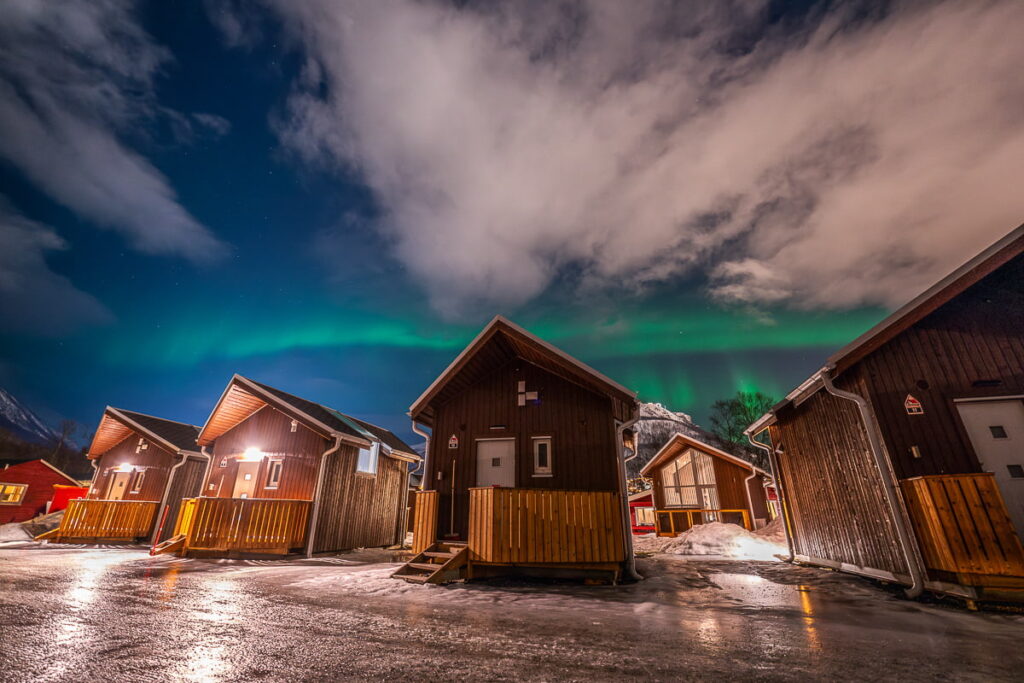
In the Winter months, the opposite phenomenon occurs, named ‘the polar night’, when the sun will not rise between November and January, which is ideal for Northern Lights viewing, therefore, the Winter months are the best time to see Aurora Borealis. In fact, Northern Lights watching is one of the main things to do in Tromso in winter.
3. Good Northern Lights Forecast
To see the Aurora Borealis, it is essential to have a good Northern Lights Forecast. As discussed in the ‘How to Interpret the Northern Lights Forecast’ section, If you are located within the Auroral oval, you will need a negative Bz IMT value at a minimum. If the other values are good as well, be prepared for a spectacle.

4. Clear Skies
You can check the Northern Lights forecasts and apps and have the greatest numbers and data and eventually see nothing! People forget this important factor that directly affects your chances to see the northern lights. Clouds! Use weather apps such as Windy or the Hello Aurora app for cloud coverage forecast.
How to Photograph Northern Lights
Experiencing the Northern Lights is truly incredible, and you’ll want to capture that memory. However, photographing the Northern Lights can be tricky. To help you learn how to photograph the Northern Lights, we’ve outlined the best camera settings for Northern Lights photography. If you don’t own a camera, continue to our next section on Android/ iPhone camera settings for Northern Lights photography.

Best Camera Settings for Northern Lights
Here are some of my tips to help you take the best Northern Lights photography with your camera:
- Tripod – It is a must since you will be doing long exposure photos, it will have to be stable.
- Manual Focus – The automatic focus will not be able to focus in dark conditions, so you will have to play with the manual focus to find it yourself. It might take a few minutes and a few photos to test, but once you find the sweet spot, you are all set.
- A Wide-Angle Lens – You will want to get more scenery in your photo so go with a wide-angle lens, anything below 28mm is great. I used the 14-24mm F2.8 DG DN Art lens with my Sony A7RIII and shot with the widest 14 mm to get the whole landscape in.
- Wide Aperture – f2.8 would work best for Aurora photography, the wide aperture will allow your camera’s sensor to collect a lot of light.
- Shutter Speed – The best shutter speed for Northern Lights photography would be between 2-5 seconds. I would not recommend going longer than that. As the Aurora might move, you would want to catch it right at the moment. Also, the earth moves so faster shutter speed will make the stars look like lines rather than tiny dots.
- ISO – It will depend on how dark the scenery is. Test the ISO between 1000-2500 until you get the right exposure.
- 2-Second Timer – When you press on the camera to take the shot, even if you are super gentle, you might cause a tiny shake to the camera which might make our long exposure Aurora Photo blurry. Putting a 2-second timer will eliminate that.
Android/ iPhone Camera Settings for Northern Lights
If you don’t have a camera, try these smartphone settings for Northern Lights Photography:
- Tripod – A must here as well.
- Night/Manual Mode – depending on your smartphone.
- Long Exposure – If you have the option for that, set anything between 3-10 seconds.
- ISO – If you can set that, try between 200-600.
- No Flash – Do not use a flash.
- Manual/ Infinity Focus – If you have an option for that.
- 3-Second Timer – to avoid any shake here as well.

Northern Lights Expectation vs Reality
When it comes to watching the Northern Lights, it’s important to have realistic expectations. First, if you are fortunate enough to witness it, be grateful for the experience. But keep in mind that not every appearance is a mind-blowing, all-night show. Every Aurora we saw was unique, it ranged from a faint green glow to bright, vivid colors dancing all over the sky for hours.

Second, people are often not aware that the Northern Lights appear differently to the naked eye compared to how they look through your camera or your smartphone. A simple reason why, our eyes are not designed to perceive colors well in low light, so we are somewhat color-blind at night! It doesn’t mean that you won’t see any of the colors but do not expect the vivid hues that your camera captures.

When we saw the Northern Lights in complete darkness, we saw mild green and red colors, but they were much less intense than what our camera showcased. The colors were much more visible in urban locations where it was not completely dark. A full moon can actually enhance your ability to see more colors with your eyes. Don’t let this discourage you from wanting to see the Northern Lights, as it was an incredible experience for us. Just keep in mind that it will look much better on your camera.

Well, this is it! We hope this guide on how to see Aurora Borealis helps you interpret the Northern Lights forecast and maximizes your chances of seeing the Northern Lights.
That was the best read and clear understanding thank you
Thanks Becky!